The map system was introduced with the Legacy of Ykesha expansion in February 2003. It provides a fairly crude map display of any zone the player is in, plus an atlas which displays the world and continents with their zone connections.
1 Map Window
2 Map Files and Layers
2.1 Map Entry Format
3 Customizing Maps
4 Map Readability
5 Map Packages
6 Hand-Drawn Maps
To open your map in-game, the default key is M. This can be changed in the Options window, Keys tab, UI category, "Map window toggle".
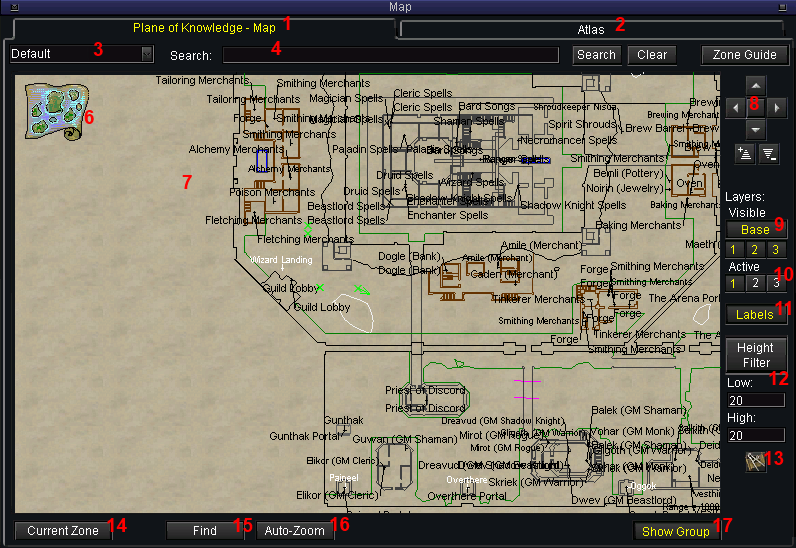
Let's examine the Map window:
- The Map tab, showing the map for a particular zone.
- The Atlas tab, showing the world.
- A combobox where you can choose your map set. See later section.
- Search box and corresponding buttons to search for particular labels on the map. Enter a string, press Enter or click the Search button, and a result set appears. Click a result, and it is highlighted on the map with a red cross.
- Zone Guide button; click to open the Zone Guide, which will guide you to a specific zone based on where you are now.
- Atlas scroll, click to "zoom out" to the continent or world above the zone you're in.
- The main map window. You are shown with a little green arrow.
- Navigation buttons. It is easier to click and hold the mouse to pan around, and mouse scroll to zoom in and out.
- Layers Visible. A map can have up to four layers (Base, 1, 2 and 3), click to toggle their visibility. See later section.
- Layers Active; effect unknown, possibly unused.
- Labels button, click to toggle the display of labels on the map.
- Height Filter. By default, the Low and High have a value of 10 each. Most, but not all (often missing from very old zones), maps have Z-axis coordinates built in, allowing you to toggle whether you want to see the entire map, or only map markings for areas that are within +/- a certain value of your current Z-axis position. Good values for High and Low depends on the zone, but 20 is a decent all-round value. Enter your desired numbers, then click the Height Filter button to toggle it on or off.
- Toolbar Window button; allows you to create your own maps and customize existing.
- Current Zone button, click to jump to your current zone. Handy if you're browsing other zones via the Atlas. Also centers the map on yourself.
- Find button, click to open the Find window (default key binding: Ctrl+F). Turns into "End Find" if you've initiated a Find already.
- Auto-Zoom button, click to toggle whether the map should automatically zoom in and out to show the entire red path when you're performing a Find.
- Show Group button, click to toggle the showing of your group mates on the map. They will appear as little green crosses. Includes mercenaries.
Other features of the Map window includes:
- Right-click any spot to begin a Find towards that point. This shows a glowing golden beam in-game that leads you towards it, and marks a path in red on the map. Click the "End Find" button to end the find or press the key binding for opening the Find Window (default key: Ctrl+F).
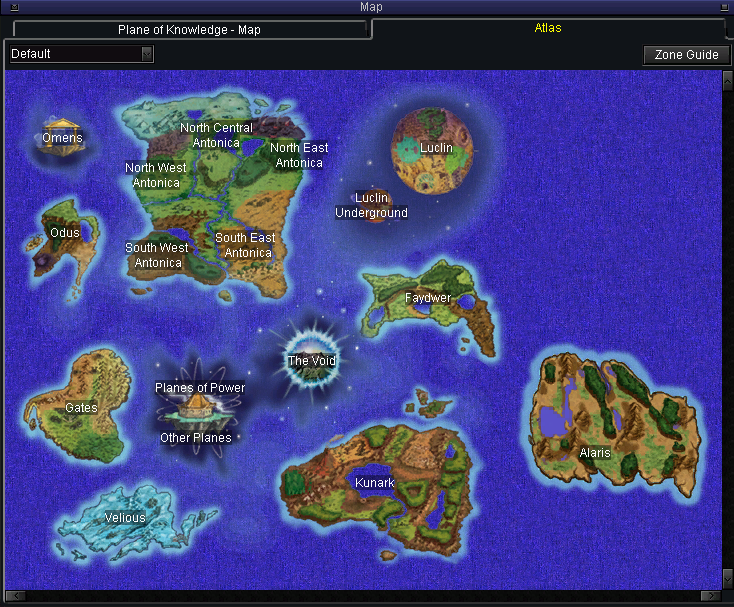
Clicking the Atlas tab shows you an overview of the world with zone connections.
If you're having trouble finding the maps for a particular zone, expansion or continent, here are a few hints:
- Old Planes such as Plane of Hate: Found under "Other Planes".
- Plane of Mischief and Plane of Growth: Found under "Other Planes". Plane of Growth is erronously named "Nature".
- The Legacy of Ykesha: Found in South East Antonica, off the south coast.
- Lost Dungeons of Norrath: Not all zone labels are clickable, but found near the original dungeons.
- Gates of Discord: "Gates" continent, also called Taelosia.
- Omens of War: "Omens" continent, also called Realm of Discord.
- Dragons of Norrath: North East Antonica, centered around Lavastorm Mountains.
- Depths of Darkhollow: North East Antonica, click Corathus Creep in the center.
- Prophecy of Ro: Found under "Other Planes".
- The Serpent's Spine: North Central Antonica
- The Buried Sea: Odus, off the south-eastern coast.
- Secrets of Faydwer: Faydwer, south-east.
- Seeds of Destruction: "The Void" in the center.
- Underfoot: Odus, click Underfoot in the bottom left.
- House of Thule: South West Antonica, click To House of Thule in the bottom left.
- Rain of Fear: Alaris, click To Shard's Landing in the top left.
Another tip is that clicking what appears to be a zone might show another part of a continent. As a general rule, a label named "To XXX" leads to another part of a continent, whereas a label with only the zone name will show the zone map. Particularly Luclin can be confusing to navigate.
The data behind the wireframe maps is found in simple text files in the "maps" directory in your EverQuest directory. The first few files in the directory will likely be:
- abysmal.txt
- abysmal_1.txt
- abysmal_2.txt
The files contain the map data for the Abysmal Sea zone. "abysmal" is the technical, shorthand name of the zone.
On the Map window, under the Layers: Visible label, are four button: Base, 1, 2 and 3. These buttons simply toggle displaying the contents of the text files related to the zone. In the case of the zone files for Abysmal Sea, the files with the different layers would be:
- Base - abysmal.txt
- 1 - abysmal_1.txt
- 2 - abysmal_2.txt
- 3 - abysmal_3.txt
Note that the "abysmal_3.txt" file is not present in the directory, which simply means that the 3rd layer button has no effect. Other files may be missing at random; only one file actually has to be present for the map to work. Some zones utilize all four layers, some just two. Layer 3 is rarely used.
If you open a map text file, you will see lines like these:
L 173.1119, -69.9920, -160.9980, 173.1617, -75.2607, -160.9980, 64, 64, 64
L 173.1160, -49.8370, -160.9980, 173.1160, -49.8369, -160.9980, 0, 0, 0
P 157.5488, -59.1857, -156.8613, 0, 0, 0, 3, Crescent_Reach
P -561.7799, 420.9374, -124.8740, 0, 0, 0, 3, Forge
There are two types of entries in the map files; Lines (L) and points (P). A line consists of two points (start and end) with each three coordinates (a 3D vector), followed by a color code. A point consists of one point with three coordinates, followed by a color code, a font size and a label.
A coordinate in the map is in the form of Y, X, Z, and is different from the in-game /loc coordinate. First, the X and Y coordinates are swapped. Second, they are multiplied by -1, meaning that 100 /loc translates into -100 in the map file.
Color codes are in the form of R (red), G (green), B (blue), meaning that 0, 0, 0 is black, and 255, 255, 255 is white.
Font sizes have three possible values: 1, 2 and 3, where 1 is the smallest (and borderline unreadable), and 3 is the largest.
Labels are written with underscores instead of spaces.
Maps can be modified either in-game or manually.
To modify a map, or create one from scratch, go to the desired zone, open the Map Window, and click the Toolbar Window in the bottom right (icon of a compass and scroll). This opens the
Some maps are hard to view, either due to lack of contrast or by being too dense with grids and labels. Some of the following tips might make it easier to view a map:
- Reduce the Alpha transparency on the map window, for example to 85%. This makes it easier to see white and grey lines on the map.
- Increase the size of the Map window by dragging its corners or edges. The default size is tiny.
- Toggle Labels and Layers on and off as desired.
- In zones with several floors or levels, use the Height Filter and set the Low/High values appropriately.
The default game ships with maps for all zones. These maps have been improved upon by the community since, and other maps can be installed easily and be used separately.
To make your own map pack, create a subdirectory in the "maps" directory in your EverQuest directory. For example, name it "custom".
Two recommend map packs to download are:
- Up to and including Veil of Alaris: Mapfiend, click the "ALL Maps" radio button, then click the "Download Map Pack" button.
- Rain of Fear: EQ Resource, click the Download button.
Each .zip file you download contains a number of .txt files; simply extract these to the "custom" directory you map.
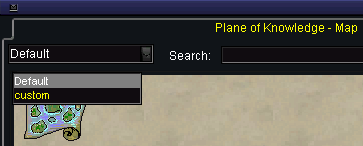
Next, in EverQuest, open your Map window, click the combobox in the top left corner, and choose the "custom" map package you have made.
From now on, map data will be drawn from here instead of the default package. Changing the map package reloads the maps, while in the game, with no need to restart.

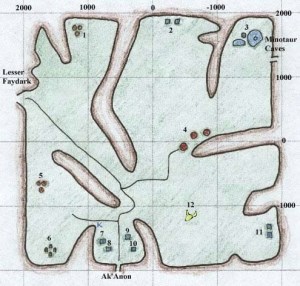
A classic hand-drawn map of The Steamfont Mountains.
Since very early on, players have taken it upon themselves to draw their own maps. The most well-known set of maps were created by "Muse", and hosted on the now defunct EQ Atlas website. Muses maps remain online on EQ Atlas hosted by Allakabor. They remain useful in older zones for finding locs and spawns, and particularly in older zones where the height filter does not work.
Another resource of hand-drawn maps is EverQuest Map Preserve, which has a large repository of custom-made maps for older zones.


